Wednesday, December 28, 2016

Product Spotlight Blog Hop: Cheerful Tags Framelits, Take 2!

Hey everyone! You're probably wondering where I've been for the last week! I know, I know, it's been Christmas and we've all been busy :) I also have my two sisters staying with me this week - and I love it. I've been spending some extra awesome quality time with my kids while they're home, too. So once they're back in school and my company has gone home, you'll see me on here a little more again. First things first!

If you've come to visit from Amanda's blog, welcome! I'm glad to have you here on the Product Spotlight Blog Hop! If you don't know what that is, click on the link at the end of this post to visit the next blog in the hop, and visit all of them! These ladies are a few of the awesome friends I've made around the continent through Stampin' Up! - and they are all talented and creative. You'll enjoy their blogs for sure.

Well, back to today! I am going to a New Year's Party this weekend and I thought I should whip up a hostess gift for my lovely friend! I made this in less than ten minutes.


I love these framelits - they make it super easy to dress up a bottle or bag. That filigree background is cut out of gold glimmer paper and really sparkles!! And those bags - you can get them here too. They're big enough to fit a wine bottle or a substantial amount of Chicago mix popcorn. If enough of it makes it from bag to bag to fill it. In this house.... chances are slim. ;)

Here's what I used to make this project:


Also - don't forget about the amazing deals this week - the Year-End Closeout sale is still going on until Jan. 3rd and there are still awesome deals to be had! This is also your last chance to get your hands on product from the Holiday Catalog. Once it's sold out, it's gone forever!

Thanks for stopping by - from here you're headed to Joni's blog. Enjoy, Merry Christmas, and Happy New Year!

Jenilee

Thursday, December 22, 2016

Product Spotlight Blog Hop: Cheerful Tags!

Hey guys! Welcome here if you're coming from Amanda Frankel's blog, Our Crafty Playdate. I have this awesome group of stamper friends in the US and Canada, and we are doing this blog hop on Thursdays! It's going to be so fun. We're choosing a product each week to focus on and we're each using those products to make our projects. This week we're using the Cheerful Tags framelits.

Without further ado, here is my project for this week!


You may recognize that box! It's the box that my monthly Stampin' Up! Paper Pumpkin comes in - I just turned it inside out so that's it's all krafty and gorgeous and ready to decorate. THEN it's perfect for holding a gift! So I added some designer paper from the Presents & Pinecones series, some ribbon, and the tag that's made using the Cheerful Tags and matching Here's to Cheer stamp set (HINT: when you buy both together, you get 10% off!). I also added a couple of stars using the Medium Star punch and the Confetti Stars Border Punch. For some added texture, I embossed the tag with the Lucky Stars embossing folder.

Here's some fancy links for the products I used to make this:


AND if you're looking for a last-minute Christmas gift that you don't necessarily have to wrap and place under the tree, consider a Paper Pumpkin subscription! They're super fun to get at your door each month and it's something that you can usually do in about a half hour - with a stamp set that you can use again and again! I'll be opening mine tomorrow night, 8 pm PST, on my facebook live page here. Come and join the party!

Now, go check out Joni's blog!

Thanks for stopping by! Have a great week and a very merry Christmas!

Jenilee

facebook: Stampin' Up! with Jenilee Pauls
instagram: artisansanonymous
email: earlandjenilee@shaw.ca

Sunday, December 18, 2016

Cloudy Days Can Be Fun, too!

OK, when I got this bundle after Onstage Vancouver, I was SO excited. It's hands-down my absolute favorite thing in the Occasions Catalog. When I discovered that there was a coordinating Designer Paper that I could get FREE during Sale-a-bration, that only sweetened the deal.


This is a little taster of that hot-air-balloon set - Lift Me Up - that will be available come January. It is sure to be a hit!! And when you purchase the bundle with the wood stamp set and framelits, you qualify for the FREE coordinating designer series paper (if you get the clear-mount rubber set, you can add a roll of twine or something like that and then you'll qualify)! I'll be using it at my January workshops. I still have a few dates left so if you'd like to host a workshop and score some extra $$ to spend on Stampin' Up!, then shoot me a message! I'll get you on the books and we'll make some pretty stuff together!

Sheesh I love those clouds.

Jenilee

Saturday, December 17, 2016

Joy to the World!

I wanted to create SOMETHING with this gorgeous adorable angel. And it just felt so Precious Moments to me, so that's where I went with it!


She's just so stinkin' cute!

The angel is stamped with versamark and embossed in white, and then colored in using Classic Stampin' Pads with an aquapainter. I've included the supply list below to make your shopping easier! The Pretty Paisleys embossing folder is on sale this month for only $8!

Enjoy your weekend!

Jenilee


Friday, December 16, 2016

Fabulous Friday!


Hey there! It is the last little bit of the afternoon before school gets out for Christmas break. My house is quiet (and freezing cold!) and I am looking out over the Chilliwack mountain range. It's gorgeous. And chilly. It's been down to almost -20 here at night (which never happens), which means that my studio is verrrrry cold. It's above my garage and only has one interior wall. Which is pretty much just a door. So yeah. I'm bundled up and I have a space heater on. LOL! Probably why I haven't posted as much this week as I usually have been!!


You'll notice that the color scheme is the same on this one as on the last couple of cards. My stamp club cards each month are a set - that means that they use the same colors and sometimes similar themes. This is the last one of the December set! It's a sequin shaker card and is inspired by the Fancy Frost suite. I just love this color combination. It's so pretty!

Be advised that some of the items on this card are in the Year-End Closeout Sale - for instance...
 - the glitter ribbon combo (not pictured, but I offered it as an alternative because it's the right color!)
- the layering circle framelits are HALF PRICE! $23 instead of $46!!
There are lots of other awesome items on sale there this month, too. AND I'm offering expedited shipping for FREE for today only (usually it's $25) for orders I receive before 7 pm. That means that the product should arrive before Christmas, yay! Time to put that bug in the ear of the person who keeps asking you what you want for Christmas!
Jenilee


Tuesday, December 13, 2016

Technique Tuesday: Belly Bands!

Here's another club card we made this week! We have a beautiful new framelit set coming out in January (hint: this isn't it!), and I wanted to brush up on making pretty belly bands. They're so easy and fun and they add so much to a card!


This card is so super simple - the base card has the flourish on it, and then the rest is all part of the belly band! To make the band, I took a 3/4" x 11" strip of whisper white and wrapped it around the card, attaching in the middle front. I then cut two strips of Silver Glimmer with the decorative strip from the Flourish Framelits, and attached those to the Whisper White Strip. Next, I made a bow out of Soft Sky cardstock using the Bow Builder Punch. I placed a Silver Tassel on the middle of the front (where the cardstock overlapped) and attached it using a glue dot, and then attached the bow using a glue dot. Finally, I made the Congrats tag and tied it on using Whisper White baker's twine. Ta-Da!

Jenilee


Monday, December 12, 2016

Celebrate Snow!!

It's crazy over here. In this part of the world, we don't get snow every year, and when it does come, it's usually only here for a little while. I'm talking sometimes less than a day. SO, this year is pretty fantastic if you ask my kids!
All of this snow has meant no school for my kids. Some of you may look at these pictures and think, "pshaw, that's nothing!" And you'd be right, in comparison. But our area is not well-equipped or practiced to deal with the snow, and so we mostly just try to stay off the roads when it looks like this. :) So far my kids have had two snow days and so I've been having fun with them! And not blogging. So here we go again. I sent them out to play and I'm taking a few quick minutes to blog!

I created this card for my December club classes - and I just absolutely LOVE this one. It's deceptively simple, and just looks great!


It's made using the Balloon Celebration stamp set. I realized that if you use the Balloon Bouquet punch on a square of paper, you can make a template that, when you arrange the photopolymer stamps on top of the template and press the block on top, will allow you to perfectly stamp and punch the balloons over. and over. and over. again! I love those tricks that make my stamping more efficient!!

The paper in the background is the Fancy Frost Specialty Designer Series Paper which is on clearance this month! Check out the clearance items here!

And my tip for attaching that Silver Metallic Thread? Place the end on the back of your balloon and press the dimensional on top. That way, you can pop up your balloons AND have your thread attached with only one step! boom!

Hope you're enjoying the weather outside as much as we are! AND PS, I hope the kids go back to school tomorrow. I love them dearly, but I gots stuff to do!

Jenilee


Thursday, December 8, 2016

A special card for a special little girl!

I love babies.

And I love getting to make special cards for them :) I got to go to a baby shower for a good friend this weekend, and this is the card I made for their family. Holding a newborn baby is like nothing else... it never gets old!!


I used the Fancy Frost Specialty Designer Series Paper on this one and sponged it with Wisteria Wonder ink. Super quick, and that paper is on sale for $13.60 right now in the Year End Closeout Sale!

Jenilee


Here's what I used to make this card!

Wednesday, December 7, 2016

Oh Happy Day!

I love this bright, happy, fun, sparkly birthday card! It has a ton of texture on it. I love how you can use washi tape to make a great patterned background on any card. This is one of my son's favorite techniques to make a quick, awesome card.

To make that tag, I did the following:
1. Stamp the "Oh happy day" sentiment on Night of Navy cardstock in versamark ink and emboss with white embossing powder.
2. Cut with the Tags & Labels framelits, inserting the circle framelit for the little ribbon hole!
3. Cut a strip of Dazzling Diamonds Glimmer Paper with the fringe scissors, taking care not to cut all the way through! Attach to the bottom of the Night of Navy tag (glimmer paper on top).
4. Using the Tear and Tape, attach a strip of Whisper White Mini Pompom Trim above the glimmer paper.
5. Using Fast Fuse, attach a little bit of Gold 1/8" Ribbon on top of the Pompom Trim and at the top of the tag.

I find that a fancy tag is sometimes all you need to make an amazing card!

Jenilee


Tuesday, December 6, 2016

December Paper Pumpkin Hack!

hey there! I had so much fun with my Paper Pumpkin party last Thursday! I went live on facebook and had fun creating one of the cards PLUS my fun little PP Hack :) Here's the video.


 These were SO easy to make and SO fun. They're so adorable. Plus, I love that they showed up on my doorstep and all I had to do was open the box and get started. No prep work. The pieces were diecut; I just had to punch them out! You can sign up for Paper Pumpkin here and get your own little box of fun delivered each month!

So I mentioned a hack. I saw the vellum and thought - wouldn't that make a super cute little luminary? SO I made one! I cut the cards into strips and attached the trees and houses to one side and the vellum to the other, and then tied the twine around the top. It's on the video. SO simple and so cute! I hope you like it!


Jenilee

PS - The Year-End Closeout Sale is still on! One important thing to remember about the Holiday catalog is that while some of the items will continue to be available, this is the LAST time you'll be able to get them as a bundle with the 10% off!  Here's a listing of the bundles that are retiring at the end of the month!


Monday, December 5, 2016

Masculine Monday: Fiesta Time!

I love that alpaca. Or llama. Or whatever it is. It's just so cute and happy!! It looks like it's all shaggy and ready to be shaved so that its hair can be made into a sweater. I love it!! Some of you know that I've taken up knitting this year, so this little guy is particularly cute to me. As is that embossing folder. I KNOW how much time it takes to make those cables now!! lol! 

This card may have a few different pieces, but they are easy to make and cut with the Birthday Fiesta stamp set and Fiesta Time Framelits. I like to lay them all out on my Big Shot and run them through on one pass :) The magnetic plate makes doing that easy!! A tip for this one though - with that Delightful Dijon banner - you will want to cut it first and then stamp it. The photopolymer stamps make it easy to see where you're stamping! And the Garden Green banner - it's flexible when you cut it so you can easily curve it to suit your needs! Awesome!

Enjoy, and have a wonderful day! I'm going to be working on cutting paper for club tomorrow and working on ideas for classes for the new year! What would you like to see on my calendar for the new year? Send me your ideas!

Jenilee

Here's what I used to make this card:

Sunday, December 4, 2016

Simple Sunday

Hey there! It's Simple Sunday - where I *try* to post a simple card. It's really not my forte. sigh.

I put this one in the simple category because it's not hard. It's easy to get everything lined up right - this is a card you could make with kids.


Seriously. That white pompom trim gets me every time. I just love it!! And a trick for you when diecutting glimmer paper - you can peel that plasticky layer off the back of the sheet and the glimmer paper will cut so much more easily! For adhering things TO the glitter side of glimmer paper I recommend using dimensionals or glue dots.

Thanks for stopping by! Check out what's going on in the YearEnd Closeout Sale in the Clearance Rack - here's some paper that's on sale (but there's lots more if you visit my shop!):


Jenilee

Here's what I used to make today's card:

Saturday, December 3, 2016

Who likes Christmas Cookies?

My kids are BEGGING me to make Christmas cookies, so today may have to be the day we do that. :) Tasha just loves to bake!
Me... I prefer to make this kind of cookie. No calories ;)


This paper is retiring at the end of the month - so it's on While Supplies Last basis now. Get it while you still can! It was so popular it was backordered earlier in the fall so I don't expect it to last! It is so super cute. I love that you can cut out those little houses and use them for embellishments! The ribbon and the washi tape that coordinate with this suite are also on sale! Check out the Year End Closeout Sale here!

What are your favorite Christmas cookies?

Jenilee


Friday, December 2, 2016

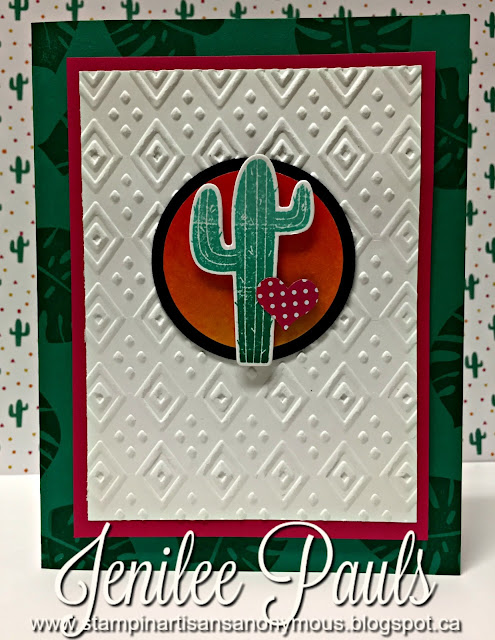
Fabulous Mexi-Friday!

Mexico is my happy place. If you've known me for any length of time, you probably know that. I was playing around with the Birthday Fiesta stamp set at our retreat earlier this month, and I came up with this card. I LOVE it. I love the cactus, I love the sunset, I love that little tiny heart. I just love it. It's Mexico in a card!!


That background is sponged using our Stampin' Sponges. I like to cut them into sixths, and then staple a tag on as a little handle in the color of cardstock I intend to use the sponge for. Now I have a sponge for every color, and they never get mixed up! Anyways, the trick to sponging like this is PRESSURE. You want to start with your lightest color and rub the color in with heavy pressure in a circular motion. I really can't emphasize that enough - I often get stampers in my classes who try to just dab the color on the paper. You're not dabbing - you're rubbing it in. You want that paper to become the color on your sponge. You don't need to be careful! Then add in your next lightest color, all the way to your darkest color. I used Daffodil Delight, Pumpkin Pie, and Melon Mambo here. And then I punched the circle out and layered it with the Basic Black circle.  

PS - Don't forget to check out the YearEnd Closeout Sale happening on the Clearance Rack! Here are just a few of the items in the sale:


Thanks for stopping in!
Where is your happy place?

Jenilee

Thursday, December 1, 2016

Thoughtful Thursday & A Sneak Peek

I have had quite the morning. This has been my view this morning:


 Because I'm a demonstrator, I get to order things a little earlier than you. So I've spent the morning putting in my huge big preorder of Occasions and Sale-a-bration product!! SO FUN! For a couple of hours, I forget that Christmas hasn't even happened yet and I go wild. I can't wait to get all my new stamps and tools and accessories in!! Have I mentioned how much I love being a Stampin' Up! demonstrator?!?

So, sorry my blog post is up a little later than usual. I've been busy!! I have all sorts of things on the calendar for the new year - so if you haven't seen it yet, check it out now! New things are being added all the time, too.

ANYWAYS... I thought that in honor of Preorder Day,  I'd share a little sneaky peek with you guys too :) I hope you love it as much as I do... and I cannot WAIT to do a class using this set with you all. It's so awesome. You're going to love it!!


ALSO (I know, I know, it's a big day!) - there is a Year-End Closeout Sale happening on the Clearance Rack starting today!! Check it out!


https://www.stampinup.com/ECWeb/CategoryPage.aspx?categoryid=20600


Jenilee