Wednesday, December 28, 2016

Product Spotlight Blog Hop: Cheerful Tags Framelits, Take 2!

Hey everyone! You're probably wondering where I've been for the last week! I know, I know, it's been Christmas and we've all been busy :) I also have my two sisters staying with me this week - and I love it. I've been spending some extra awesome quality time with my kids while they're home, too. So once they're back in school and my company has gone home, you'll see me on here a little more again. First things first!

If you've come to visit from Amanda's blog, welcome! I'm glad to have you here on the Product Spotlight Blog Hop! If you don't know what that is, click on the link at the end of this post to visit the next blog in the hop, and visit all of them! These ladies are a few of the awesome friends I've made around the continent through Stampin' Up! - and they are all talented and creative. You'll enjoy their blogs for sure.

Well, back to today! I am going to a New Year's Party this weekend and I thought I should whip up a hostess gift for my lovely friend! I made this in less than ten minutes.


I love these framelits - they make it super easy to dress up a bottle or bag. That filigree background is cut out of gold glimmer paper and really sparkles!! And those bags - you can get them here too. They're big enough to fit a wine bottle or a substantial amount of Chicago mix popcorn. If enough of it makes it from bag to bag to fill it. In this house.... chances are slim. ;)

Here's what I used to make this project:


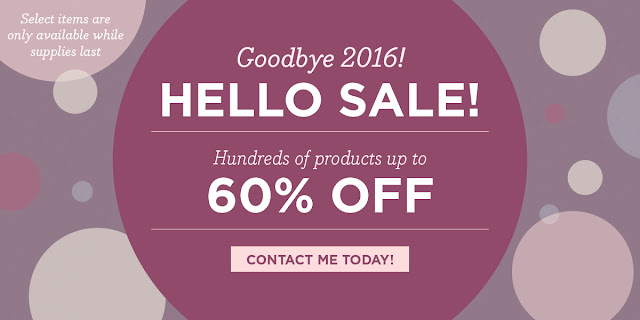
Also - don't forget about the amazing deals this week - the Year-End Closeout sale is still going on until Jan. 3rd and there are still awesome deals to be had! This is also your last chance to get your hands on product from the Holiday Catalog. Once it's sold out, it's gone forever!

Thanks for stopping by - from here you're headed to Joni's blog. Enjoy, Merry Christmas, and Happy New Year!

Jenilee

Thursday, December 22, 2016

Product Spotlight Blog Hop: Cheerful Tags!

Hey guys! Welcome here if you're coming from Amanda Frankel's blog, Our Crafty Playdate. I have this awesome group of stamper friends in the US and Canada, and we are doing this blog hop on Thursdays! It's going to be so fun. We're choosing a product each week to focus on and we're each using those products to make our projects. This week we're using the Cheerful Tags framelits.

Without further ado, here is my project for this week!


You may recognize that box! It's the box that my monthly Stampin' Up! Paper Pumpkin comes in - I just turned it inside out so that's it's all krafty and gorgeous and ready to decorate. THEN it's perfect for holding a gift! So I added some designer paper from the Presents & Pinecones series, some ribbon, and the tag that's made using the Cheerful Tags and matching Here's to Cheer stamp set (HINT: when you buy both together, you get 10% off!). I also added a couple of stars using the Medium Star punch and the Confetti Stars Border Punch. For some added texture, I embossed the tag with the Lucky Stars embossing folder.

Here's some fancy links for the products I used to make this:


AND if you're looking for a last-minute Christmas gift that you don't necessarily have to wrap and place under the tree, consider a Paper Pumpkin subscription! They're super fun to get at your door each month and it's something that you can usually do in about a half hour - with a stamp set that you can use again and again! I'll be opening mine tomorrow night, 8 pm PST, on my facebook live page here. Come and join the party!

Now, go check out Joni's blog!

Thanks for stopping by! Have a great week and a very merry Christmas!

Jenilee

facebook: Stampin' Up! with Jenilee Pauls
instagram: artisansanonymous
email: earlandjenilee@shaw.ca

Sunday, December 18, 2016

Cloudy Days Can Be Fun, too!

OK, when I got this bundle after Onstage Vancouver, I was SO excited. It's hands-down my absolute favorite thing in the Occasions Catalog. When I discovered that there was a coordinating Designer Paper that I could get FREE during Sale-a-bration, that only sweetened the deal.


This is a little taster of that hot-air-balloon set - Lift Me Up - that will be available come January. It is sure to be a hit!! And when you purchase the bundle with the wood stamp set and framelits, you qualify for the FREE coordinating designer series paper (if you get the clear-mount rubber set, you can add a roll of twine or something like that and then you'll qualify)! I'll be using it at my January workshops. I still have a few dates left so if you'd like to host a workshop and score some extra $$ to spend on Stampin' Up!, then shoot me a message! I'll get you on the books and we'll make some pretty stuff together!

Sheesh I love those clouds.

Jenilee

Saturday, December 17, 2016

Joy to the World!

I wanted to create SOMETHING with this gorgeous adorable angel. And it just felt so Precious Moments to me, so that's where I went with it!


She's just so stinkin' cute!

The angel is stamped with versamark and embossed in white, and then colored in using Classic Stampin' Pads with an aquapainter. I've included the supply list below to make your shopping easier! The Pretty Paisleys embossing folder is on sale this month for only $8!

Enjoy your weekend!

Jenilee


Friday, December 16, 2016

Fabulous Friday!


Hey there! It is the last little bit of the afternoon before school gets out for Christmas break. My house is quiet (and freezing cold!) and I am looking out over the Chilliwack mountain range. It's gorgeous. And chilly. It's been down to almost -20 here at night (which never happens), which means that my studio is verrrrry cold. It's above my garage and only has one interior wall. Which is pretty much just a door. So yeah. I'm bundled up and I have a space heater on. LOL! Probably why I haven't posted as much this week as I usually have been!!


You'll notice that the color scheme is the same on this one as on the last couple of cards. My stamp club cards each month are a set - that means that they use the same colors and sometimes similar themes. This is the last one of the December set! It's a sequin shaker card and is inspired by the Fancy Frost suite. I just love this color combination. It's so pretty!

Be advised that some of the items on this card are in the Year-End Closeout Sale - for instance...
 - the glitter ribbon combo (not pictured, but I offered it as an alternative because it's the right color!)
- the layering circle framelits are HALF PRICE! $23 instead of $46!!
There are lots of other awesome items on sale there this month, too. AND I'm offering expedited shipping for FREE for today only (usually it's $25) for orders I receive before 7 pm. That means that the product should arrive before Christmas, yay! Time to put that bug in the ear of the person who keeps asking you what you want for Christmas!
Jenilee


Tuesday, December 13, 2016

Technique Tuesday: Belly Bands!

Here's another club card we made this week! We have a beautiful new framelit set coming out in January (hint: this isn't it!), and I wanted to brush up on making pretty belly bands. They're so easy and fun and they add so much to a card!


This card is so super simple - the base card has the flourish on it, and then the rest is all part of the belly band! To make the band, I took a 3/4" x 11" strip of whisper white and wrapped it around the card, attaching in the middle front. I then cut two strips of Silver Glimmer with the decorative strip from the Flourish Framelits, and attached those to the Whisper White Strip. Next, I made a bow out of Soft Sky cardstock using the Bow Builder Punch. I placed a Silver Tassel on the middle of the front (where the cardstock overlapped) and attached it using a glue dot, and then attached the bow using a glue dot. Finally, I made the Congrats tag and tied it on using Whisper White baker's twine. Ta-Da!

Jenilee


Monday, December 12, 2016

Celebrate Snow!!

It's crazy over here. In this part of the world, we don't get snow every year, and when it does come, it's usually only here for a little while. I'm talking sometimes less than a day. SO, this year is pretty fantastic if you ask my kids!
All of this snow has meant no school for my kids. Some of you may look at these pictures and think, "pshaw, that's nothing!" And you'd be right, in comparison. But our area is not well-equipped or practiced to deal with the snow, and so we mostly just try to stay off the roads when it looks like this. :) So far my kids have had two snow days and so I've been having fun with them! And not blogging. So here we go again. I sent them out to play and I'm taking a few quick minutes to blog!

I created this card for my December club classes - and I just absolutely LOVE this one. It's deceptively simple, and just looks great!


It's made using the Balloon Celebration stamp set. I realized that if you use the Balloon Bouquet punch on a square of paper, you can make a template that, when you arrange the photopolymer stamps on top of the template and press the block on top, will allow you to perfectly stamp and punch the balloons over. and over. and over. again! I love those tricks that make my stamping more efficient!!

The paper in the background is the Fancy Frost Specialty Designer Series Paper which is on clearance this month! Check out the clearance items here!

And my tip for attaching that Silver Metallic Thread? Place the end on the back of your balloon and press the dimensional on top. That way, you can pop up your balloons AND have your thread attached with only one step! boom!

Hope you're enjoying the weather outside as much as we are! AND PS, I hope the kids go back to school tomorrow. I love them dearly, but I gots stuff to do!

Jenilee


Thursday, December 8, 2016

A special card for a special little girl!

I love babies.

And I love getting to make special cards for them :) I got to go to a baby shower for a good friend this weekend, and this is the card I made for their family. Holding a newborn baby is like nothing else... it never gets old!!


I used the Fancy Frost Specialty Designer Series Paper on this one and sponged it with Wisteria Wonder ink. Super quick, and that paper is on sale for $13.60 right now in the Year End Closeout Sale!

Jenilee


Here's what I used to make this card!

Wednesday, December 7, 2016

Oh Happy Day!

I love this bright, happy, fun, sparkly birthday card! It has a ton of texture on it. I love how you can use washi tape to make a great patterned background on any card. This is one of my son's favorite techniques to make a quick, awesome card.

To make that tag, I did the following:
1. Stamp the "Oh happy day" sentiment on Night of Navy cardstock in versamark ink and emboss with white embossing powder.
2. Cut with the Tags & Labels framelits, inserting the circle framelit for the little ribbon hole!
3. Cut a strip of Dazzling Diamonds Glimmer Paper with the fringe scissors, taking care not to cut all the way through! Attach to the bottom of the Night of Navy tag (glimmer paper on top).
4. Using the Tear and Tape, attach a strip of Whisper White Mini Pompom Trim above the glimmer paper.
5. Using Fast Fuse, attach a little bit of Gold 1/8" Ribbon on top of the Pompom Trim and at the top of the tag.

I find that a fancy tag is sometimes all you need to make an amazing card!

Jenilee


Tuesday, December 6, 2016

December Paper Pumpkin Hack!

hey there! I had so much fun with my Paper Pumpkin party last Thursday! I went live on facebook and had fun creating one of the cards PLUS my fun little PP Hack :) Here's the video.


 These were SO easy to make and SO fun. They're so adorable. Plus, I love that they showed up on my doorstep and all I had to do was open the box and get started. No prep work. The pieces were diecut; I just had to punch them out! You can sign up for Paper Pumpkin here and get your own little box of fun delivered each month!

So I mentioned a hack. I saw the vellum and thought - wouldn't that make a super cute little luminary? SO I made one! I cut the cards into strips and attached the trees and houses to one side and the vellum to the other, and then tied the twine around the top. It's on the video. SO simple and so cute! I hope you like it!


Jenilee

PS - The Year-End Closeout Sale is still on! One important thing to remember about the Holiday catalog is that while some of the items will continue to be available, this is the LAST time you'll be able to get them as a bundle with the 10% off!  Here's a listing of the bundles that are retiring at the end of the month!


Monday, December 5, 2016

Masculine Monday: Fiesta Time!

I love that alpaca. Or llama. Or whatever it is. It's just so cute and happy!! It looks like it's all shaggy and ready to be shaved so that its hair can be made into a sweater. I love it!! Some of you know that I've taken up knitting this year, so this little guy is particularly cute to me. As is that embossing folder. I KNOW how much time it takes to make those cables now!! lol! 

This card may have a few different pieces, but they are easy to make and cut with the Birthday Fiesta stamp set and Fiesta Time Framelits. I like to lay them all out on my Big Shot and run them through on one pass :) The magnetic plate makes doing that easy!! A tip for this one though - with that Delightful Dijon banner - you will want to cut it first and then stamp it. The photopolymer stamps make it easy to see where you're stamping! And the Garden Green banner - it's flexible when you cut it so you can easily curve it to suit your needs! Awesome!

Enjoy, and have a wonderful day! I'm going to be working on cutting paper for club tomorrow and working on ideas for classes for the new year! What would you like to see on my calendar for the new year? Send me your ideas!

Jenilee

Here's what I used to make this card:

Sunday, December 4, 2016

Simple Sunday

Hey there! It's Simple Sunday - where I *try* to post a simple card. It's really not my forte. sigh.

I put this one in the simple category because it's not hard. It's easy to get everything lined up right - this is a card you could make with kids.


Seriously. That white pompom trim gets me every time. I just love it!! And a trick for you when diecutting glimmer paper - you can peel that plasticky layer off the back of the sheet and the glimmer paper will cut so much more easily! For adhering things TO the glitter side of glimmer paper I recommend using dimensionals or glue dots.

Thanks for stopping by! Check out what's going on in the YearEnd Closeout Sale in the Clearance Rack - here's some paper that's on sale (but there's lots more if you visit my shop!):


Jenilee

Here's what I used to make today's card:

Saturday, December 3, 2016

Who likes Christmas Cookies?

My kids are BEGGING me to make Christmas cookies, so today may have to be the day we do that. :) Tasha just loves to bake!
Me... I prefer to make this kind of cookie. No calories ;)


This paper is retiring at the end of the month - so it's on While Supplies Last basis now. Get it while you still can! It was so popular it was backordered earlier in the fall so I don't expect it to last! It is so super cute. I love that you can cut out those little houses and use them for embellishments! The ribbon and the washi tape that coordinate with this suite are also on sale! Check out the Year End Closeout Sale here!

What are your favorite Christmas cookies?

Jenilee


Friday, December 2, 2016

Fabulous Mexi-Friday!

Mexico is my happy place. If you've known me for any length of time, you probably know that. I was playing around with the Birthday Fiesta stamp set at our retreat earlier this month, and I came up with this card. I LOVE it. I love the cactus, I love the sunset, I love that little tiny heart. I just love it. It's Mexico in a card!!


That background is sponged using our Stampin' Sponges. I like to cut them into sixths, and then staple a tag on as a little handle in the color of cardstock I intend to use the sponge for. Now I have a sponge for every color, and they never get mixed up! Anyways, the trick to sponging like this is PRESSURE. You want to start with your lightest color and rub the color in with heavy pressure in a circular motion. I really can't emphasize that enough - I often get stampers in my classes who try to just dab the color on the paper. You're not dabbing - you're rubbing it in. You want that paper to become the color on your sponge. You don't need to be careful! Then add in your next lightest color, all the way to your darkest color. I used Daffodil Delight, Pumpkin Pie, and Melon Mambo here. And then I punched the circle out and layered it with the Basic Black circle.  

PS - Don't forget to check out the YearEnd Closeout Sale happening on the Clearance Rack! Here are just a few of the items in the sale:


Thanks for stopping in!
Where is your happy place?

Jenilee

Thursday, December 1, 2016

Thoughtful Thursday & A Sneak Peek

I have had quite the morning. This has been my view this morning:


 Because I'm a demonstrator, I get to order things a little earlier than you. So I've spent the morning putting in my huge big preorder of Occasions and Sale-a-bration product!! SO FUN! For a couple of hours, I forget that Christmas hasn't even happened yet and I go wild. I can't wait to get all my new stamps and tools and accessories in!! Have I mentioned how much I love being a Stampin' Up! demonstrator?!?

So, sorry my blog post is up a little later than usual. I've been busy!! I have all sorts of things on the calendar for the new year - so if you haven't seen it yet, check it out now! New things are being added all the time, too.

ANYWAYS... I thought that in honor of Preorder Day,  I'd share a little sneaky peek with you guys too :) I hope you love it as much as I do... and I cannot WAIT to do a class using this set with you all. It's so awesome. You're going to love it!!


ALSO (I know, I know, it's a big day!) - there is a Year-End Closeout Sale happening on the Clearance Rack starting today!! Check it out!


https://www.stampinup.com/ECWeb/CategoryPage.aspx?categoryid=20600


Jenilee


Wednesday, November 30, 2016

One-Set Wednesday

Hi guys!

I was trying a while back there to design a super simple card but I kept getting caught up in adding details. You know me, lol! I love lots and lots of embellishments! So this was one in the process of working towards simple. I just LOVE those leaves. This stamp set, Pop of Paradise, is so super cute. Those leaves are stamped in versamark and then embossed with Emerald Envy Glitter Stampin' Emboss Powder on Emerald Envy cardstock. I then fussy-cut those leaves. I love the effect; don't you?!


What's your favorite stamped image to fussy-cut? Which ones are worth it for you?

ALSO - let's see your cards made with this color combo!


Jenilee


Tuesday, November 29, 2016

Technique Tuesday: DIY Designer Paper!


Today's Technique Tuesday is: DIY Designer Paper! All you need is a blank sheet of cardstock (I used Very Vanilla), a stamp set, and some ink. For this card, I used the Paisleys & Posies photopolymer stamp set and I used the colors that are used in the Petals & Paisleys Specialty Designer Series Paper. Then you just start stamping! I like to start with the big images - the Night of Navy paisleys - because they take up the most room so you need to make sure there's space! Next I did the Delightful Dijon smaller paisleys, then the Cajun Craze medallions, the Rich Razzleberry flowers, the Mint Macaron leaves and finally, the Soft Suede mini flowers. It does take a bit of practice to get your DIY DSP looking just the way you want it but once you have the idea, it is a super economical way to get lots of color in your projects!

I hope you like it!

OOH - today and tomorrow are the LAST DAYS of the Stitched Shapes Sale. Unfortunately, the framelits themselves are unorderable until mid-January (you guys really loved them!!) but the stamp sets are still on sale!!


Jenilee

Here are the items I used to make this card:

Saturday, November 26, 2016

Celebration Saturday!

It's time to Celebrate!!

So I guess that the day after Black Friday is known as Small Business Saturday - a day to encourage and support small business vs. big box businesses (we do that on Black Friday). I like it.

I wanted to introduce Celebration Saturday - a day when I will share a celebratory project with you! This one is great for a birthday, or really any occasion warranting cake. Which, in my opinion, is just about any occasion!!


This card uses the Shaker Shapes Framelits which are a whopping 40% off this weekend until end of day Monday!!! So awesome! And the "celebrate" stamp is from the Shake & Celebrate stamp set which is 20% off! I love making shaker cards - they're so cute and fun. I filled this one with cupcake sprinkles, but you could put lots of things inside these - think mica flakes, glitter, confetti, jingle bells, etc.

There are lots of things to celebrate - this weekend I'm celebrating my birthday (woohoo!) and the fact that Gilmore Girls came out this weekend. I'm writing this post BEFORE I've watched it... so we will have to talk about that later!! I've come to the end of the busy part of November - usually my busiest month of the year - and I'm still smiling - so I'm celebrating that too! I am already beginning to book Sale-a-bration parties for the new year - so if you are thinking you would like to host one, contact me! If you contact me before I contact you, I'll give you a little something special :) I love it when my customers get excited about stamping, and I especially LOVE to see your friends fall in love with it too. Just a little FYI - I am cooking up something that I'll be revealing soon that I am super excited about. Stay tuned for more information!!

Jenilee

Friday, November 25, 2016

Fabulous (Black) Friday!

I love this name. Fabulous Friday! It's the day when I am going to share my favorites with you. Can't wait!! I made this one a few months as one of the Make & Takes for Stampin' Bingo. I have another Stampin' Bingo coming up on Dec. 5th and I hope you'll join us!! These evenings are SO much fun!!
This card was the first time I got to play with our copper embossing powder. I just love it. This Affectionately Yours designer series paper contains two sheets with gold foil on them. They are just beautiful!! I hope you love this one as much as I do! It uses one of my top favorite stamp set and framelit bundles from the Annual Catalog - Flourishing Phrases. It's a great item to get when you host a workshop because if your sales are high enough, you can get it half price! woohoo! Another option is to sign up as a demonstrator and get this in your starter kit - right now a starter kit will save you over $65 versus a regular order. It's always a good idea to join Stampin' Up! We have super fun team meetings monthly too - our next one is Dec. 13th. Contact me if you think you might be interested and we can chat more!

Jenilee


Thursday, November 24, 2016

Ornament Time!

Some of you may be taking the day off today... but here in Canada, it's business as usual! I have a Stitched with Cheer stamp-a-stack this morning and a Beautiful Bags class tonight. Busy day!!

But I wanted to show you something cute and simple and quick - this would be a perfect project to do along with your kids or grandkids!


These cute little clear plastic ornaments are fairly easy to find, and you can fill them with just about anything! Here, I chose to fill one with our White Pompom Trim and tie a bow with the Real Red 3/4" Stitched Edge Ribbon. and DONE!
The second ornament is filled with our Gold Sequin Trim and adorned with a Gold Satin Ribbon bow and a little star made from 3 gold glimmer stars made with our Medium Star Punch. I used Fast Fuse on half of one star and attached a second. I then put Fast Fuse on the other half of the first star and attached a third star, and then attached the two free edges together. I punched a hole with the 1/8" Handheld Circle Punch and then tied it on with the gold twine from the Baker's Twine Trio Pack.

Wouldn't your holiday decorating be adorable with these?!

Jenilee

Wednesday, November 23, 2016

One-set Wednesday

I thought it would be fun to do blog posts on Wednesdays featuring cards that use ONLY ONE stamp set. If you know me... you'll know that I like to mix & match (which is fine). BUT I want to show you cards that YOU can make super easily using just a single stamp set - since many of you may not have a huge collection. I want to make cards that you can reproduce without breaking the bank!


Hello! This has got to be one of my favorite cards this fall. AND *it's my birthday in a week.* So I love birthday cards this week :)

I had just ordered this stamp set, Better Together, and started using it. I love that the sentiment fits so nicely inside the stitched oval! And I love those roses. They are watercolored using the Melon Mambo & Old Olive ink pads and the Aquapainter. TIP - before opening the ink pad, squish the top & bottom together. You'll get ink on the inside of the lid and it's perfect for picking up with the Aquapainter! Just be careful not to squeeze too hard while coloring with the Aquapainter so you don't get any big globs of water on your flowers. You want to color them daintily.

Don't you love how those ovals fit so perfectly together?! The stitched one nestles in so nicely with the scalloped one. All of our Stitched Shapes framelits work that well together. It's awesome.

OK, hope you have an awesome day! Don't forget about this fabulous deal I have going on right now - order from me during the Online Extravaganza (which doesn't have to be an online order, by the way) and get a FREE roll of Black Metallic Thread. Just for ordering! Please use hostess code YZK3MEM2 if you're placing your order online!


Thanks, and have a great week!

Jenilee


Tuesday, November 22, 2016

Beautiful Bags are so versatile!

The Beautiful Bags class is coming up on Thursday night - and it's not just for wine! You can fill those bags with just about anything - take this one for example! Who doesn't love Chicago mix popcorn?!? It would make a great hostess gift for the Christmas season!  Or anytime. I would personally love it if someone showed up at my door with a bag of something yummy with a cute tag on it. It would pretty much make my week!


Contact me if you're interested in joining me on Thursday night!

Jenilee

Monday, November 21, 2016

Online Extravaganza! And Masculine Monday :)

 Ummm... so this is my favorite week of the year. NOT just because it's my birthday. OK, well, mostly. My birthday's actually NEXT Monday, but it often falls during Black Friday week, which always just feels so festive and exciting. Even for a Canadian!! haha!

Stampin' Up! always has their awesome sale this week, so I decided to add a little sumpin' of my own to the sweetness - a free roll of black metallic thread when you place an order with me between Nov. 21 & 28! I love that thread; it just adds that little bit of shine that just makes a project stand out!

OK, now for my today's project. I've decided that I'm going to be featuring cards that can be used for the male population on Mondays - hence, Masculine Mondays. These won't just be cards for men - they could be for all ages: babies, boys, teens, sons, brothers, husbands, dads, grandpas (or if you're in our family, Opas!). So without further ado, here's my Masculine Monday card for today!


I love this sweet little card - and I'll give you a couple of tips for insight into how I build my cards. First of all, for this card, I wanted to use the Foxy Friends stamp set and Fox builder punch - and that Foxy Friends designer series paper stack just matches perfectly! So I knew that I would be basing my card on the DSP which meant the colors were going to be Smoky Slate, Pool Party, Whisper White, and Calypso Coral. Great! That fox was super cute stamped in Calypso Coral! A note when using the fox builder punch - some of the images are stamped mirror image - so that means that you can either punch them first and then stamp them (which is super easy considering the stamps are photopolymer) or stamp the miscellaneous pieces which are aligned the right way for the punch, and then punch and assemble them. It just means that the fox's tail will be pointing the OTHER way if you choose to use the separate stamps (ie - stamping the tail only as opposed to the stamp with the entire fox).

Anyways. Isn't that bowtie just too cute?? I love it! Now all he needs are a pair of specs.

Another tip for this card - the designer paper pieces are cut into 2"x3" which means that you can get 6 from each sheet in the 6"x6" stack! With no waste! Love it!

Jenilee

Saturday, November 19, 2016

Stampin' Up! is for knitters too!

OK.
Some of you know that I started knitting about a year ago, and that I loooooove knitting. A lot. I also love Stampin' Up!, and I have been trying to figure out how I can combine the two.


Aaand you're welcome. Stampin' Up! stitch markers and progress keepers!! Perfect for that knitter on your Christmas gift list!!

OK one more:


Gah! Those pinecones are just so stinkin' cute!!!

They're available in my online store - and come in packs of 24! So you can make a whole bunch of them for your favorite knitter! And they will love them :)

aaannndddd.. what if you make a little card to put them on?


Super easy! You just need to pick up some of those little rings you get in the jewellery-making section in any craft section of a store, and a pair of needle-nose pliers. Done!

Jenilee


Friday, November 18, 2016

Online Extravaganza is almost here!!


Online Extravaganza is almost here - it starts on Monday. And thus starts the week of mad shopping and purchasing craziness.

Have you ever gone Black Friday shopping? It's not such a big thing here in Canada, but I live right near the Washington border so I'd talked for years about going and experiencing the madness. It was insane.

I had just found out I was pregnant with my first son, and I went into Bellingham with my mom and her friend. Our plan was to get there right at midnight so we could be there right at the beginning.

Except people had been lining up for HOURS. We went into JC Penney and there was literally a line around the entire whole store. You'd have to wait in line for two or three hours to pay for something. Not worth it, in my opinion! Another time, Earl and I went and we went into Best Buy and there was almost a riot when they opened the doors. Complete insanity.

That's why I love the cyber sales. You can make yourself a steaming cup of coffee and sit in front of your computer and it's just... peaceful. :)

AND to make it even better, I'm giving you a sneak peek of what's going to be on sale, so you can make your purchasing decisions without all the pressure of am-I-going-to-get-what-I-want-what-if-it's-sold-out-when-I-get-there?! Just email your orders to me and if they're doorbusters or retiring items, we can get that order in first thing Monday morning. All orders qualify for a FREE GIFT from me that will be mailed out in the first week of December!

And then I'm going to get my hair done.

*Jenilee's hint of the day* If there's a lot on your wishlist, now is the time to put in a big order! This is the biggest sale of the year, so you'll get more bang for your buck. Think Christmas presents, birthday presents for the year... you can even talk to your family & friends and give them your wishlists. Get me to open up a host code for you so you can get freebies when your order total reaches $200! And then share that host code with your friends for the potential of even more freebies!

Jenilee

Star of Light Stamp-a-Stack Part 2


I designed this card to go along with my previous one for my Star of Light Stamp-a-Stack. Hope you like it!

Jenilee


Thursday, November 17, 2016

Star of Light Showstopper

This is my favorite card I've ever made to date. Which is saying something. In the eight years I've been a Stampin' Up! demonstrator, I've made A LOT of cards. But this is by far my favorite stamp set.


This month, I did a Stamp-a-stack involving this card and one I'll show you tomorrow TWICE. Plus, we made it at out demonstrator sneak peek meeting in August! So fun :) I love getting together with my demo friends and stamping together! We got to do this at our event in Vancouver last weekend. I wish all of my stamping friends could be there with me! It's demonstrators only though - so if you want to come, you gotta buy a starter kit. Darn. You need to save $100 on a pile of awesome product. Poor you. PLUS, I am throwing in a paper copy of the Occasions catalog for the first five people who sign up with me this month! That's a month earlier than you'd receive the catalog otherwise... which in itself is worth it in my opinion! I love getting to see product before anyone else. Probably my very favorite thing about being a demonstrator. :)

Anyways, BACK to my card! It's using the Star of Light stamp set & framelits (see link below), and it's simple yet gorgeous. Although, I will tell you, diecutting 90 of those stars will take you a li'l while. Get a good show on and get going. :) Dies like this make me so happy that we can get such intricate images without fussy cutting!!! They're just so pretty. A tip for my card - I scored and folded the copper foil star at the back just to give it a little more dimension. That way, it reflects the light a little bit more and is just that much prettier!

Jenilee


Wednesday, November 16, 2016

The Weather Outside is Frightful!

From the first time I saw this stamp set, I knew I had to have it.

And seriously, I don't even ski anymore. But that is a long story for another day.
Today we're making a seriously cute shaker card!!

Again, I used the Warmth & Cheer Designer Series Paper Stack (can you tell by now that I love this paper?!?) and I used a little 2 1/2 x 3 1/4" piece of Whisper White to stamp the mountain, ski lift, trees and cabin on. I colored them with the Aquapainter and then assembled the shaker card. I love those mica flakes for shaker cards this year!!! So cute!! And the little stamped and cut out tree and sign are just adorable.

Jenilee


Tuesday, November 15, 2016

Washi Tape Makes a Christmas Merrier

Again with the Warmth & Cheer Designer Series Paper. I tell you, I can't get enough of this stuff!!


The tag is a super easy 2" x 4 1/2" rectangle punched with the Scalloped Tag Topper punch - and then stamped using the Cherry Cobbler & Garden Green Stampin' Write Markers. I love how you can get multiple colors on a stamp using the markers! And then finished off with the Warmth & Cheer washi tape and gold twine. (which is a showstopper, by the way!). Super easy, super quick card. And beautiful!

Jenilee


Monday, November 14, 2016

Merry & Bright, Warm & Cheery

I think this designer series paper stack has got to be one my of my favorites that we've ever had. It makes me smile every time I look at it!! And I have loved pretty much every single thing I've made with it! It doesn't get much better!!


I also love Crumb Cake cardstock, so that probably goes a long way to explaining why I love this DSP stack so much!! We made this card at our Artisan Stamp Club earlier this month (see here for my events page on my SU website!). A few steps, but worth it in my opinion!

Do you prefer your cards clean and simple, or the fancier the better?

Jenilee

Sunday, November 13, 2016

Joy to the World Part Deux


Now how do you like this one?! I needed a super simple yet super cute card for a class I have coming up. This fits the bill perfectly. And I just can't get over the chalkboard look - but just how simple it is. It's Whisper White Craft Ink on Basic Black Cardstock. Easy-peasy. Some of the girls I've showed this to have mentioned that the ink seemed to dry much quicker than they remembered. My tip is to do your craft ink stamping first, and then set your pieces aside while you prepare the rest of your card. Also, your craft white ink pad will probably come super, super juicy - after you use it a bit it will be less juicy and will stamp nicer! Remember - this is a foam ink pad and you don't need to press your stamp in there super hard. Just tap, tap, tap on top and you'll get a nice stamped image!!

Hope you enjoy! If you like this card enough to want to make a bunch of them, I'm offering a Stamp-a-Stack for this card and the one I posted yesterday. $25 for 12 cards, including envelopes! First person to message me and set a date gets to pick the date!

OR, you can just purchase the products needed to make this one and make a bunch of them at home! See the list below of products I used!

Jenilee


Saturday, November 12, 2016

Joy to the World!


Well, 'tis the season for getting ready for Christmas, I guess! Here's a little cutie I whipped up yesterday. And it's actually pretty simple - which if you know me at all, you'll know is no small miracle. Which also means that there aren't THAT many products in this so it's a pretty economical card to reproduce too!! I love that little angel! She's so cute!

Now that I'm thinking of it, this is a pretty Stamp-a-Stack-worthy card. And just wait until you see the other one I made with this set. SO CUTE! These two would make a great stamp-a-stack. If you think you'd like to make these, then message me and we'll set up a class! $25 for 12 cards!

What's your favorite stamp image in the holiday catalog this year?

Jenilee


Friday, November 11, 2016

Stitched Shapes Make Tags Pop!

Hey everyone!

I got my Stitched Shapes Framelits in this week, and I have been sooooo excited to play with them! I needed to design some tags for my Beautiful Bags class coming up on Nov. 24, and these framelits were absolutely perfect! I used the Here's to Cheers stamp set for the stamping and then added some glittery accents to create these beautiful hostess bags. I love to bring a bottle of wine or treat when I go to Christmas parties, and how great are these going to be all ready to go! We'll be making 2 of each bags & tags - so 6 total - for $25. RSVP to me at earlandjenilee@shaw.ca.

Check out this stamp set I used:

And here are the framelits:

 SO CUTE!

The stamp set can be purchased singly or in a bundle with the supercute Cheerful Tags framelits.  Which I was going to use on this project but couldn't find. I gave up after looking for them for over 2 hours. I'll probably find them at the end of retreat. gah! Does that ever happen to you? Where do you usually find things?

Jenilee

Thursday, February 11, 2016

Every Day is an Ice Cream Day!

I don't know what the weather is like where you are, but here in Southwestern BC it is dreary. The clouds are out in full force (what else is new?!) and it's misting enough that it's not quite raining, but the ground is wet. 

Yuck.

Can you tell I'm an indoor girl?! haha :)

This card make me think of sunshiny summer days. And even though it's not like that outside today, I can enjoy the thought. Although I'm not gonna lie, this designer series paper makes me want a bowl of ice cream. (Cones are too messy. I opt for bowls. Yes, I know I'm wierd.)


I wanted to throw together a 2-minute card for my Artisan Stamp Club. I try to have a 2-minute, a 5-minute, and a 10-minute card. Ish. Anyways, this is my 2-minute card! I hope you like it! The Soft Suede pieces are embossed with the Tiny Triangles Embossing Folder in my Big Shot, and the drippy part of the cone (*shudder*) is punched with a scallop circle punch out of Blushing Bride cardstock (to match the honeycomb!) And don't you just LOVE that glitter ribbon?! So pretty!

I hope you like! What kind of food quirks do you have?

Jenilee


Built for Free Using: My Stampin Blog